How to build an AI-powered coach app using no-code tools and WhatsApp
It's remarkable how no-code tools and automation now enable quick creation of valuable, monetizable POCs. In this article, we'll build our own AI chatbot, showcasing this potential.
Today, I'd like to walk you through the process of creating a personal diet coach application that communicates with users via WhatsApp. Even if this specific use-case is not interesting to you, the beauty is in the process itself, and the way it’s handled using AI and no-code tools. Enjoy!
Oh! One more thing before we start. We created a special 💎 Gems section for our paid Subscribers. In this sections you’ll find materials accompanying this tutorial, such as readymade automation blueprint. But that’s not all. Gems will be full of great tools and discounts, too!
This example comes directly from my life, as I recently used a similar service with a personal trainer, which is very popular and costs $299 per month. The concept involves logging your meals and physical activity daily, while a personal trainer helps you improve your fitness and maintain a healthy lifestyle. The issue was that much of the advice was quite generic, and despite direct contact, it was challenging to get appropriate advice in the moment, such as what to choose from a restaurant menu.
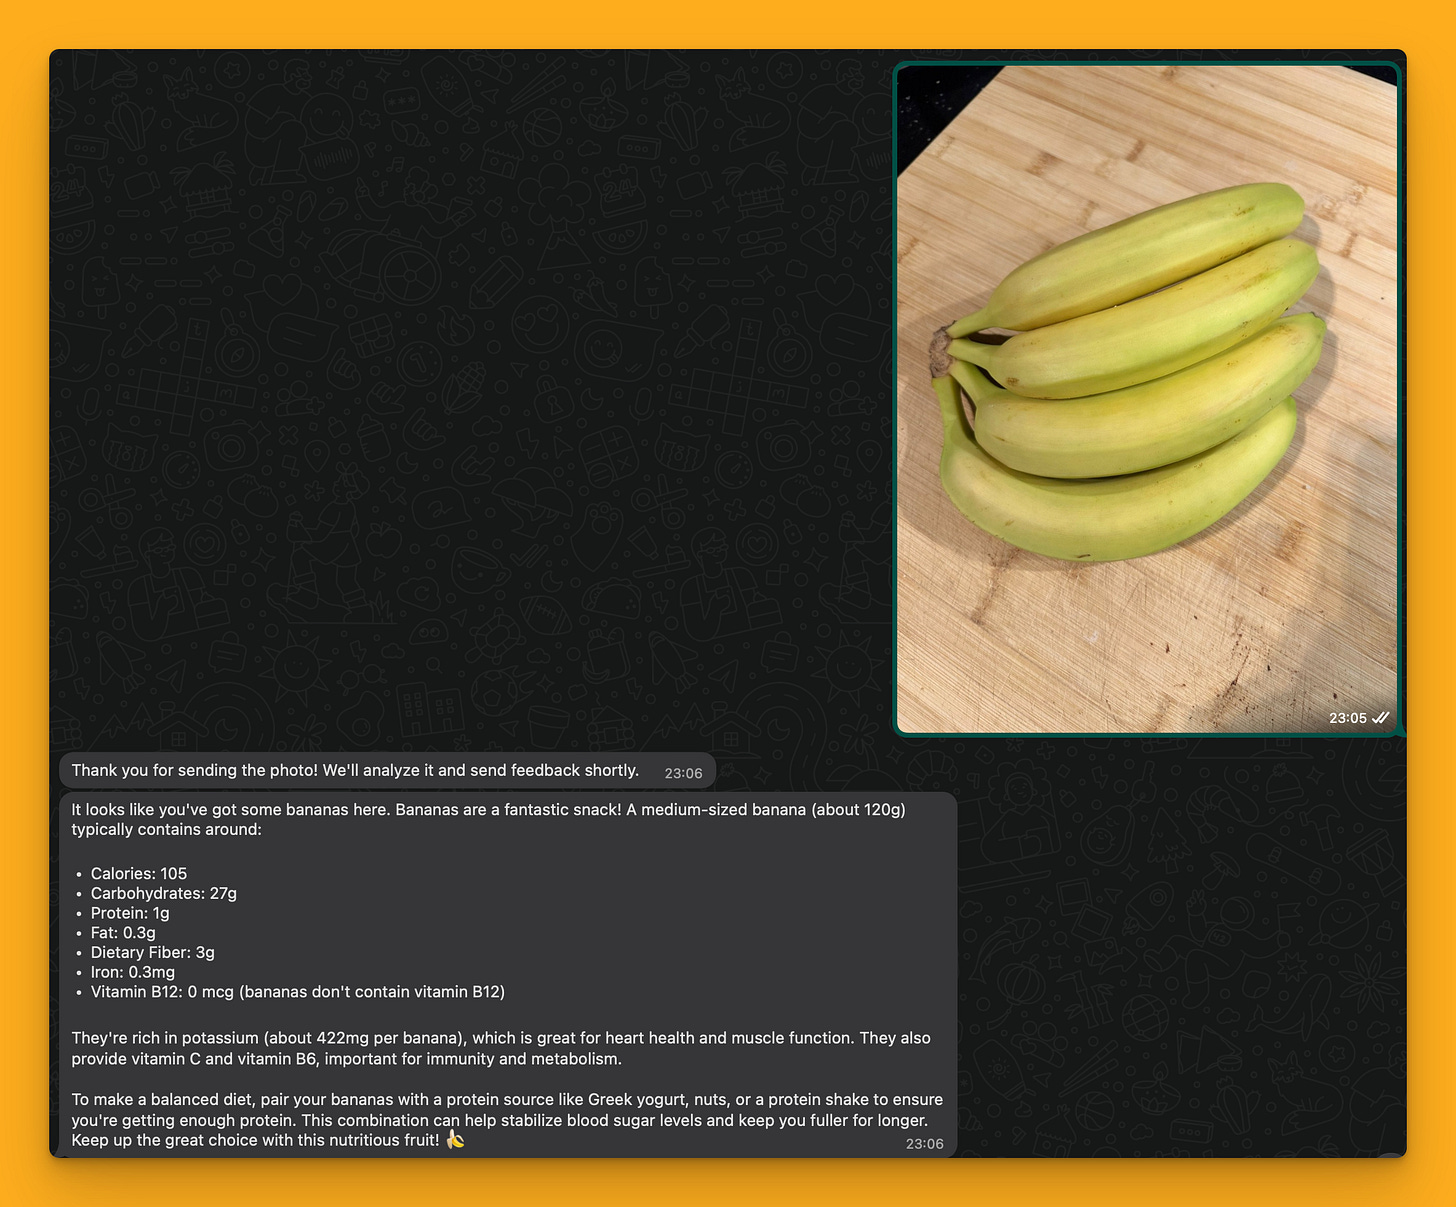
So, I decided to employ AI for this purpose, keeping WhatsApp as the communication channel, which is convenient and always at hand. Here's one of the example applications of the assistant that allows you to get information about a specific meal or food:
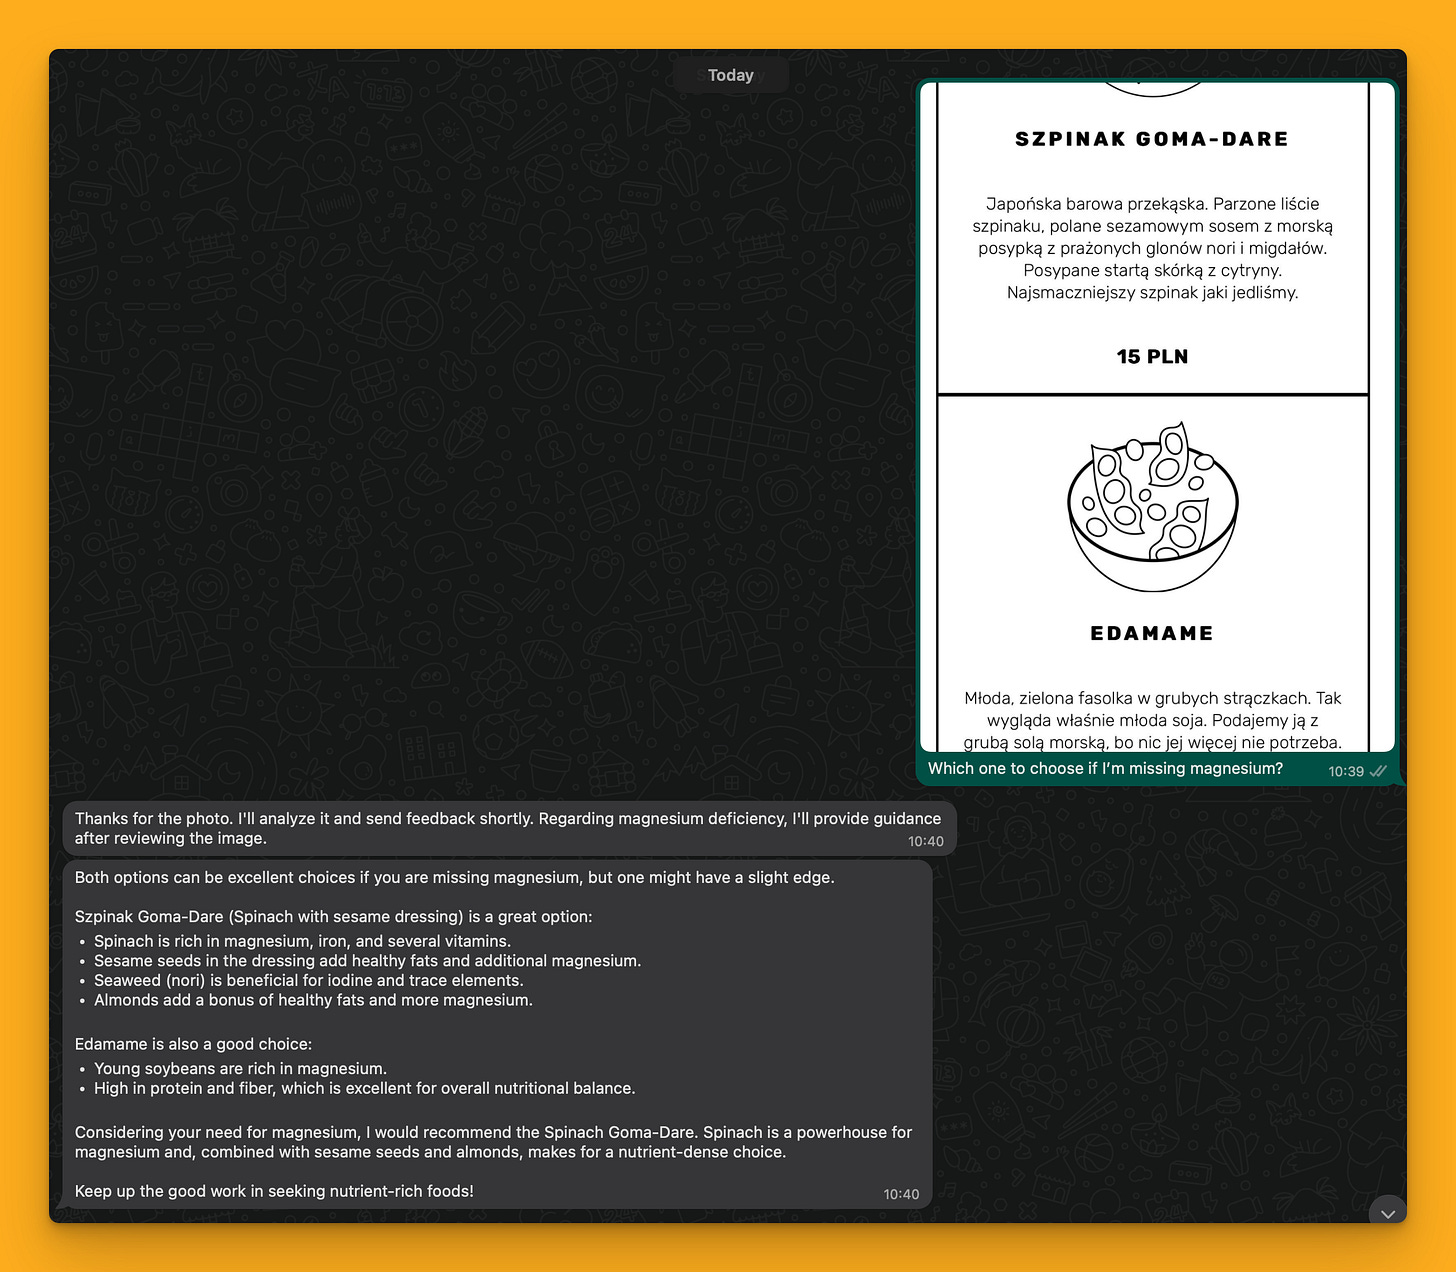
But this is just the beginning, take a look at the following examples, like help with making better choice in the restaurant:
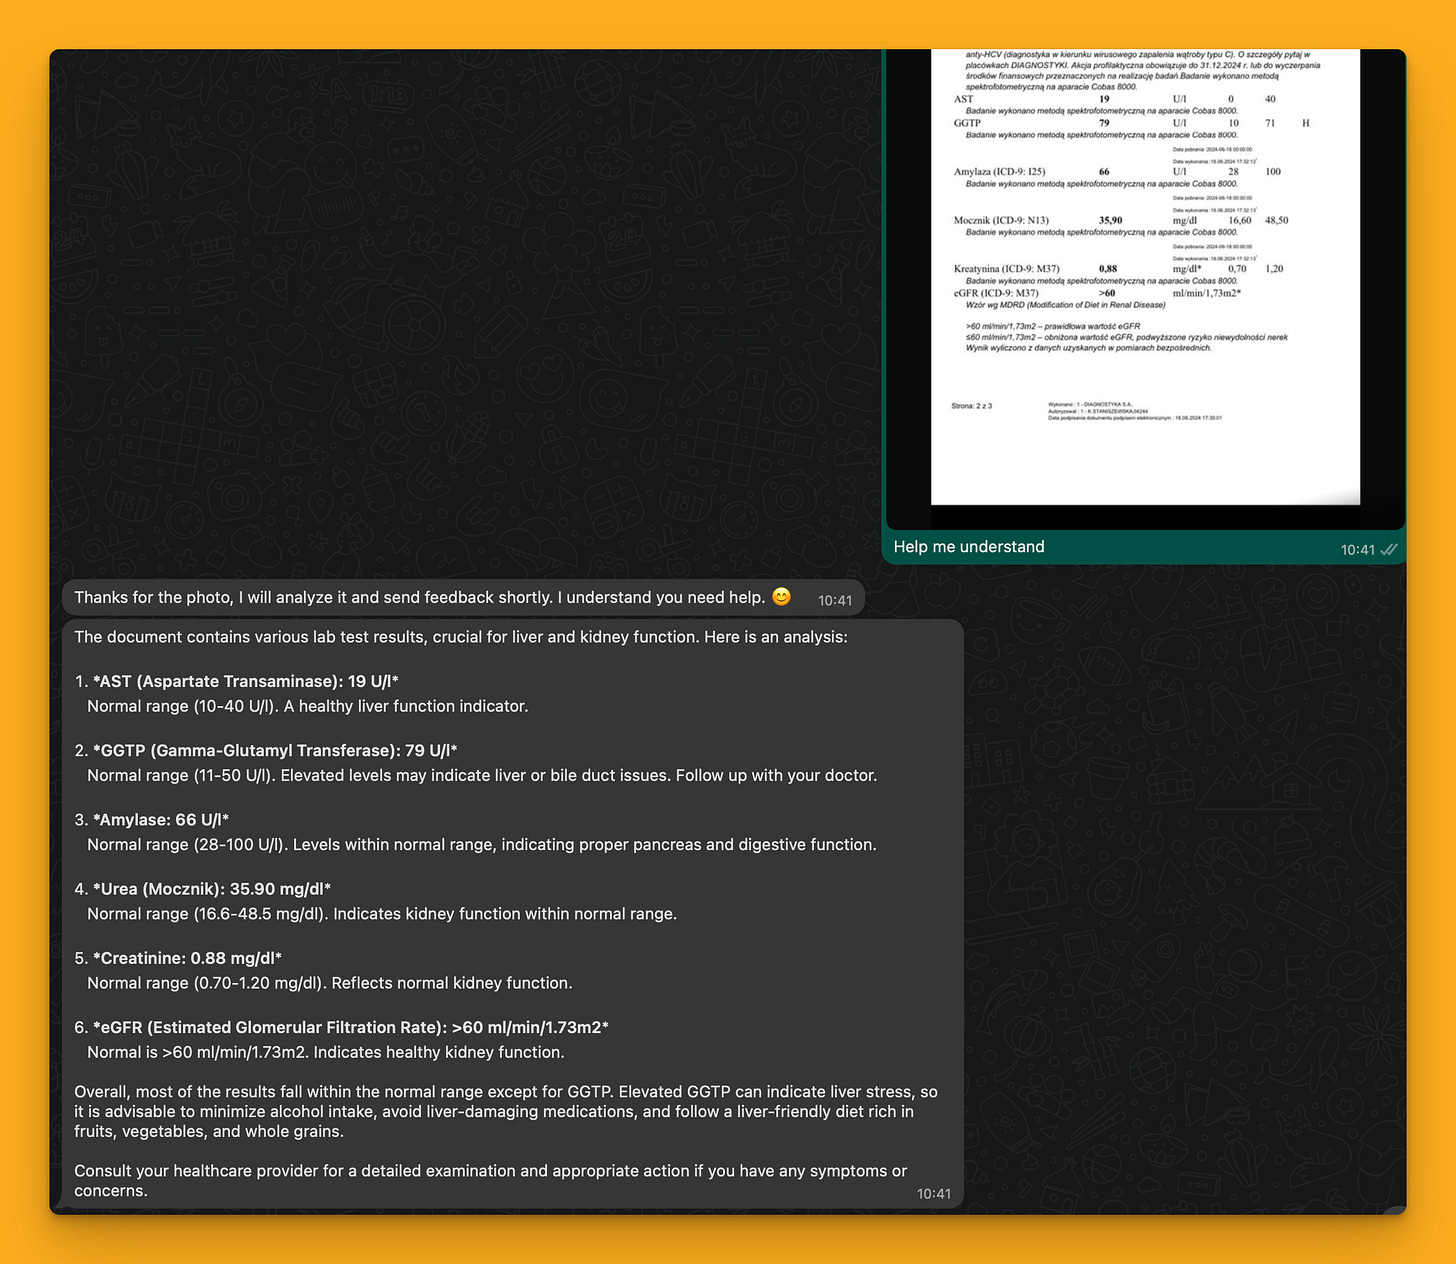
Analysing lab results:
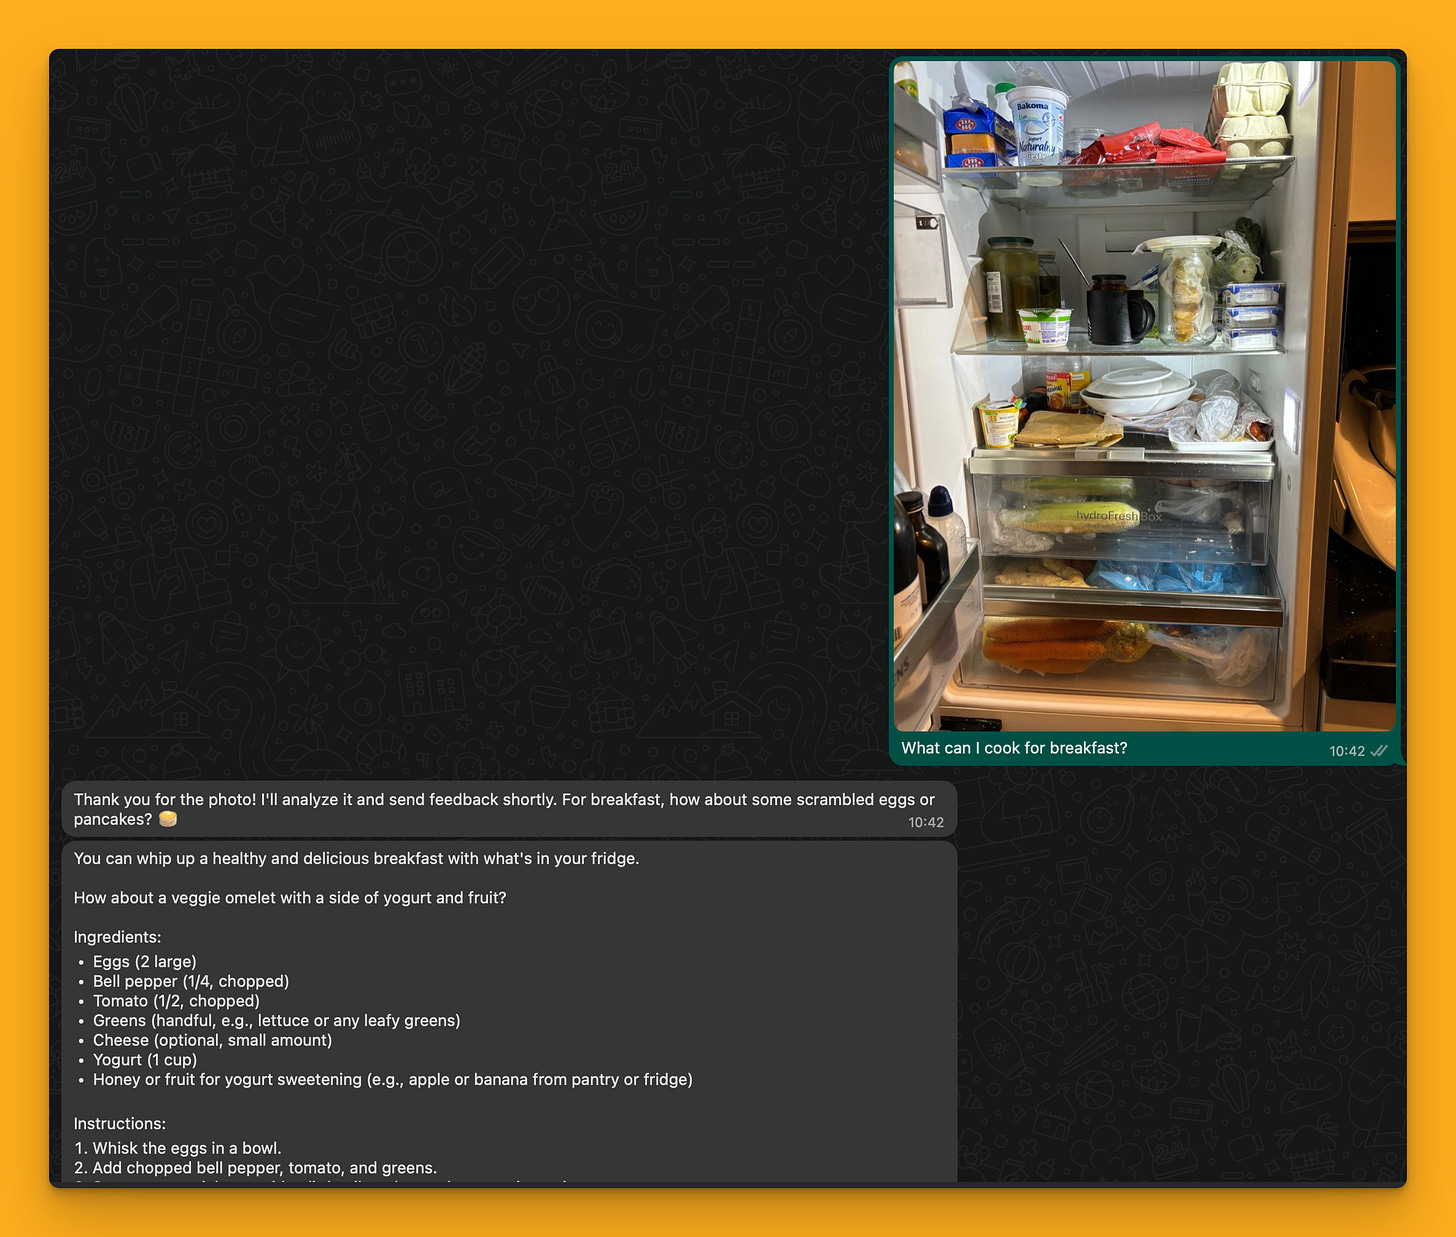
And even making sense of really poor fridge contents:
What’s important, replies, even for photos are coming in a timely manner, it takes 10-30 seconds to analyse and provide results for the user:
You can build other practical tools that can be easily monetized on a similar principle. Imagine, for example, such applications:
A language learning assistant that sends you a daily email with a list of words to learn, and then quizzes you on your knowledge via messenger.
A Discord bot for programmers that improves and analyzes code. You paste a piece of code and receive suggestions on how to enhance it.
A mental health assistant for Founders, with whom you have constant contact via text messages, helping you reduce stress and make good decisions.
I'd like you to treat this as an exciting adventure with automation and AI, starting by creating something that will be useful for you. I personally use the mentioned assistant several times a day, and my friends, seeing how it works, are asking how to get access. Firstly, you'll learn a lot; secondly, you'll create something that's actually useful to you; and thirdly - you might consider monetizing it, and even if not, you'll certainly shine in company ;)
You can use my readymade automation blueprint! It’s available to Techsistence subscribers in 💎 Gems section.
Before you start — a shortcut
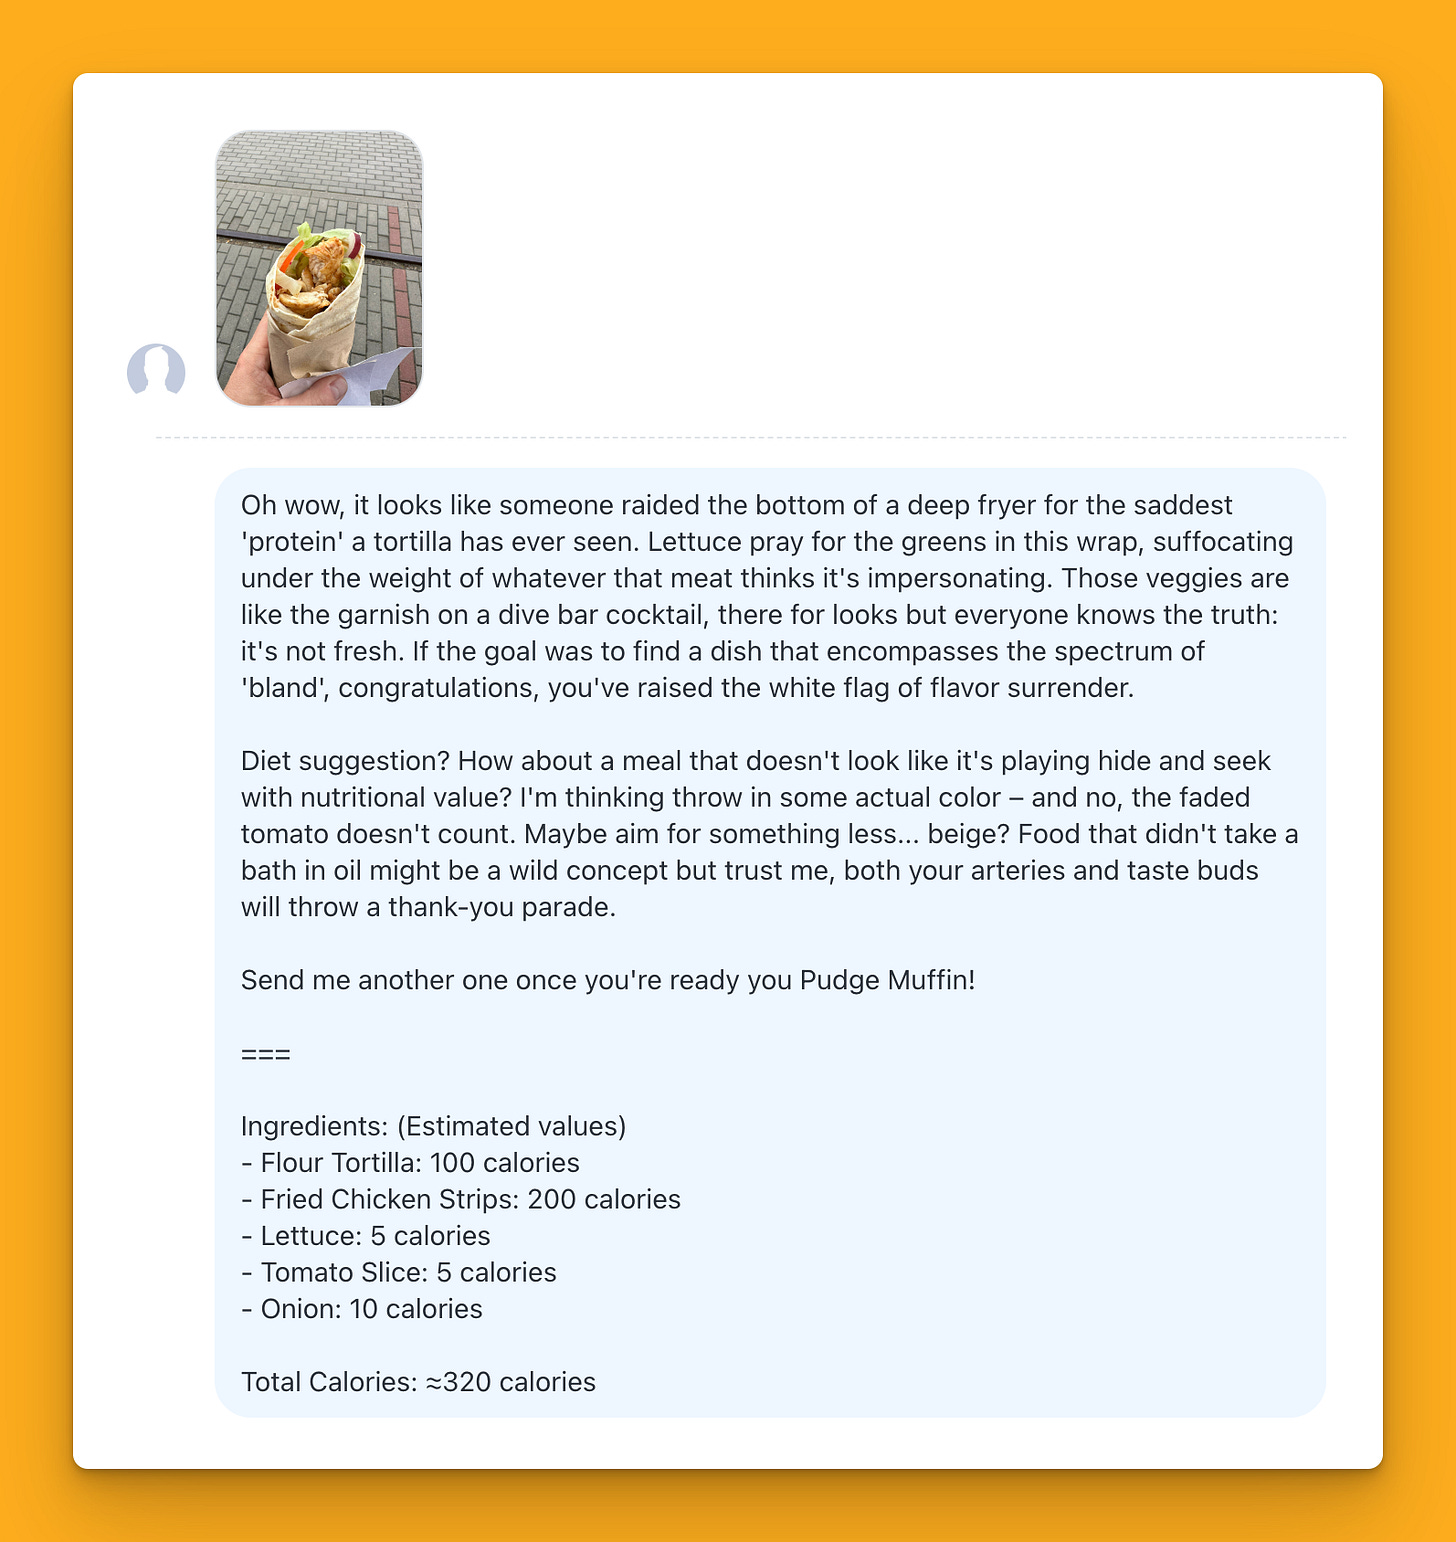
There are many tools that allow you to create chatbots using channels like Messenger or WhatsApp. In some cases, this might be a shortcut for you. One such tool is Manychat, which allows you to prepare automations in a visual builder and even connect them with AI. This is how I prepared a simple bot that roasts my meals.
These types of tools have certain limitations, and we can't control everything. Additionally, they're quite expensive - using Manychat costs several dozen dollars. That's why, to have more control, save money, and learn something interesting along the way, we'll prepare such a bot ourselves with the help of automation!
Step 1: Connecting WhatsApp Account
In this step, you need to create an application and connect your WhatsApp Business Cloud account to the make.com tool. This account will be linked to your Facebook account. You'll need:
This is probably the most boring part of the process, but it won't take you more than 20 minutes if you follow these instructions. There's a video there that describes the whole process.
In one part, the above description is not entirely precise. Adding your phone number as a test number (which we need!) is located in this place, contrary to what you'll find in the guide:
If you've managed to do it - congratulations 🎉 This was the most difficult part of the entire process.
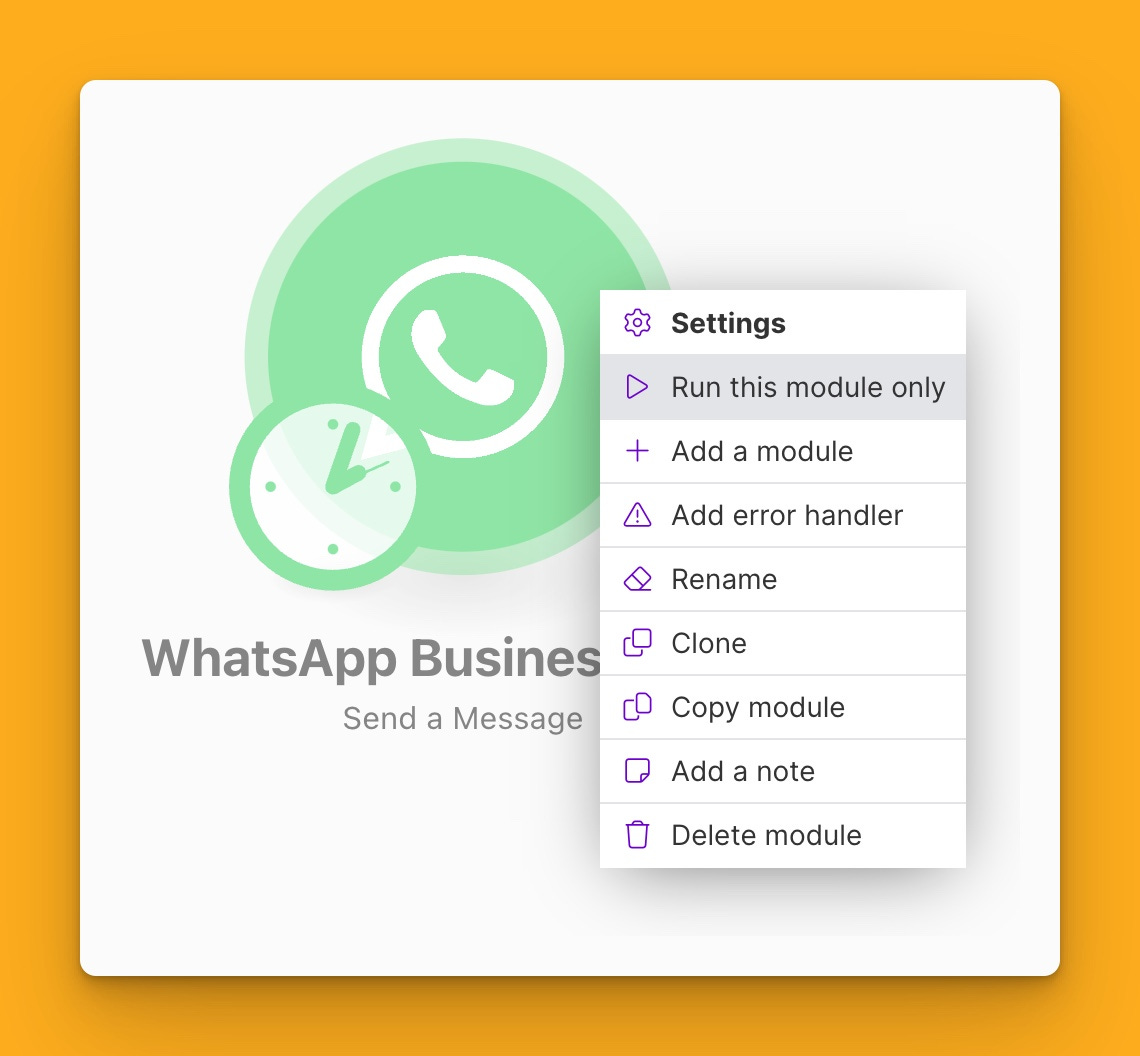
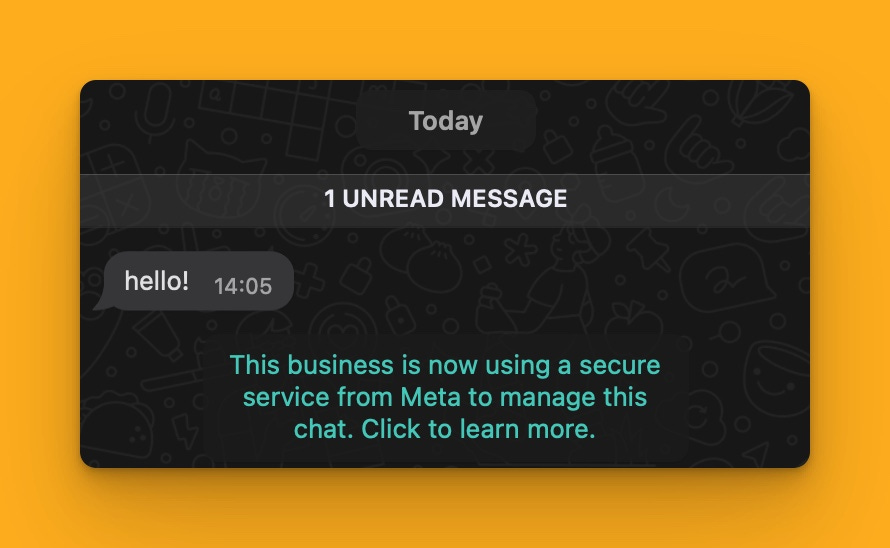
Now you have a working WhatsApp Business Cloud account and you can add other test numbers to it. When you're ready to monetize, you can switch to a paid number and... that's it! The result of your work should also be creating the first simple automation scenario in Make to test if the connection works. So we start from this point - add the WhatsApp Business Cloud module with the Send Message action, select the connected account and enter the phone number that's on the list of test numbers. Then, choose text and type any message. Confirm these changes and select the right button on the module, then the 'Run this module only' command.
You should receive your first message.
This stage of work can be considered complete. You now have the ability to send messages from your automation, as well as listen for new messages sent to the WhatsApp number and create responses with the help of AI. However, before we tackle that, we'll create a data structure that we'll gradually fill in, equipping our application with additional features.
Step 1.5 (optional): Quick Success
I hope that the received message gave you a bit of dopamine and you're ready for further work. And if not, then buckle up, because I'm about to show you how you can prepare a working MVP of such an application in just a few minutes, with the help of only a few additional modules!
Basically, you'll need a simple scenario consisting of 4 modules.
First, you listen for events with the WhatsApp Business Cloud → Watch Events module - this way you'll receive information about a message that comes to your phone number obtained from Facebook. Enable listening in the scenario and send a message with a picture - this way you'll receive data and fill in the subsequent modules.
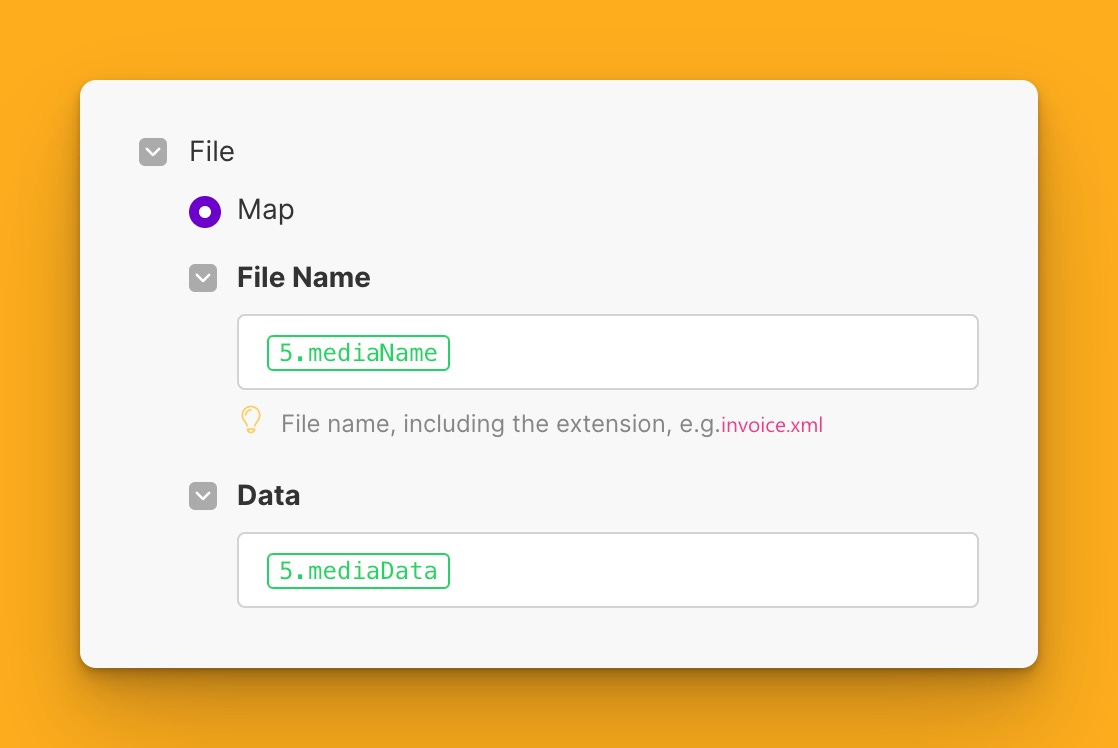
The Dropbox module captures the file sent to WhatsApp and saves it in a directory of your choice. This is necessary in order to create a public link in the next step, which we can pass to OpenAI. Unfortunately, the picture from WhatsApp comes in the form of data and we cannot use this format directly in the OpenAI module, so we need this Dropbox module to save the data (it can also be Google Drive or any other cloud), and we pass the properties to this module from WhatsApp:
Next, we create the mentioned link in the next Dropbox module → Create/Update a Share Link. This module will receive the file we sent as input and create a link in response, which we'll use in the OpenAI module.
The OpenAI module takes this address in the following way, after selecting the Vision model, which analyzes images.
When it comes to the prompt itself that we use in the OpenAI module, we can start with this:
Make your best guess about the quantities of food and their ingredients. List the ingredients, calories, total calories and important nutrition data including: proteins, fat, carbohydrates, iron,
B12. If you can give any advice how this meal could be improved or complemented during the day for better health benefits, do.
Encourage user to keep going if the meal is healthy and explain what could be improved if not so much.
The last module is simply sending the prepared message to the user, using WhatsApp → Send a Message.
Yes! It's that simple.
You could say that these few simple modules handled the entire process and constitute a ready MVP of the tool. Photos sent to this number will be appropriately analyzed and commented on. On the same principle, and even simpler, with just two modules - OpenAI and Send Message, you can analyze and send responses to sent text messages. This way, your users will be able to ask about anything and receive an answer.
As I mentioned, I wanted to encourage you to further work this way, and I hope you managed to create this simple example. However, of course, our application is not complete at this point. We don't have any user data, so we won't be able to monitor their progress and create reports, collect payments from them, etc., not to mention that it would be nice to prepare different paths and scenarios as well as onboarding for new users, and support for multiple languages.
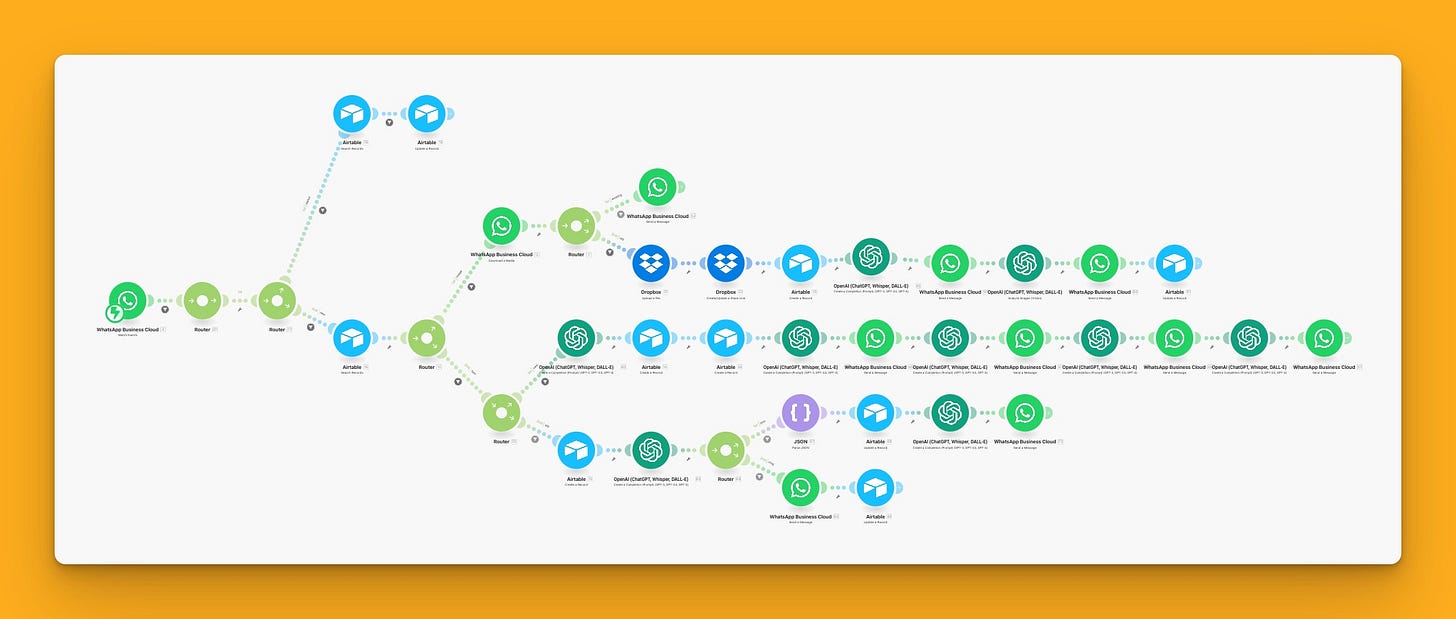
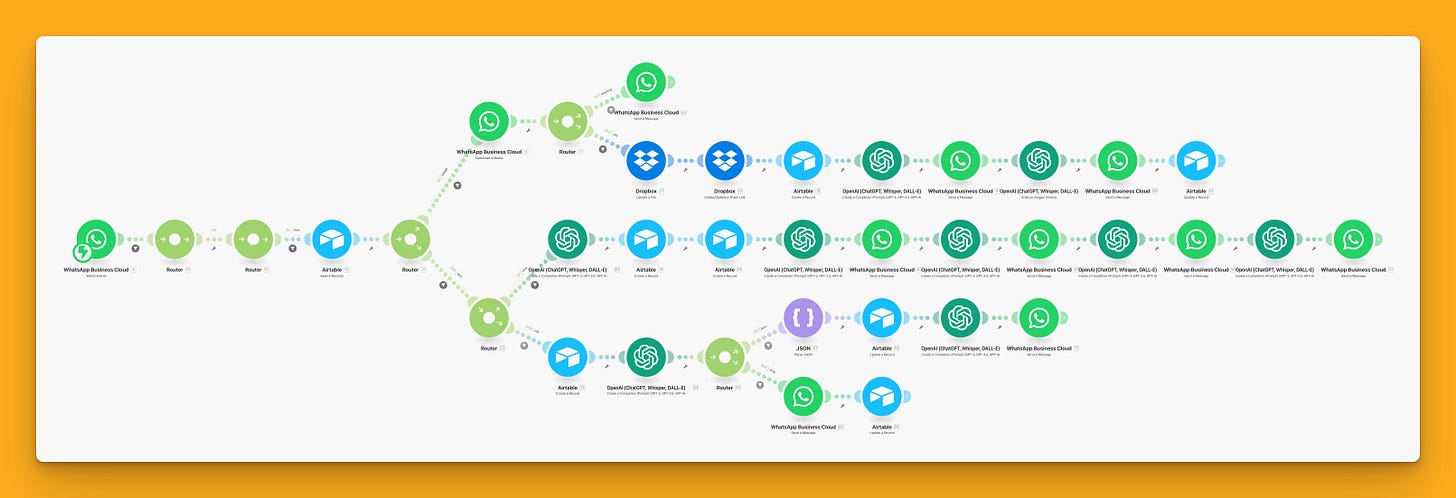
Fortunately, we can do all of this by simply expanding our scenario and adding new paths, thus without coding, in a simple and intuitive way. Follow my instructions to arrive at a complex scenario that looks something like this:
Step 2: Preparing the Airtable database
For this step, you need:
A free Airtable account
A database with a structure
My database consists of two tabs: Clients and Entries, divided in this way to have separate access to client information and each subsequent conversation.
The database structure for this step is available for one-click cloning in the materials for subscribers in 💎 Gems section.
Things worth noting at this stage of designing this database:
I've included a 'lang' field that will automatically detect the client's language, allowing me to handle conversations in any language
The tabs are connected using a Link type field, so I can easily see client data from the conversation level, as well as all conversations from the client level.
I've added a formula in the 'conversation' field that looks like this: "https://wa.me/" & {wa_id} where wa_id will store the client's WhatsApp identifier, allowing me to access the conversation history from a hotlink.
Step 3: Basics of scenario building
With the database ready, we can start preparing the scenario in Make. Let's start from the very beginning, although you can place the modules you prepared in Step 1.5 somewhere on the side if you completed it. They'll come in handy at a later stage. In any case, the trigger must be the WhatsApp Business Cloud → Watch Events module. In this simple way, we want to listen for messages sent to us by clients.
After sending a message, it will reach our scenario. I assume we'll react to two types of messages in the following way:
When someone sends a photo - we want to inform about its nutritional values
When someone sends text - we want to answer the question asked
In addition, there are also various exceptions that we can handle, for example:
When someone sends a photo of a restaurant menu - we help them make a choice
Therefore, first of all, let's make a condition that will check whether we're dealing with an image or text. This can be easily extracted from the information that will come to us about the message, so it's enough to create a Router and then set filters on the appropriate paths. For the image, it's respectively:
And for text, the same, we use 'Does not exist' as the operator.
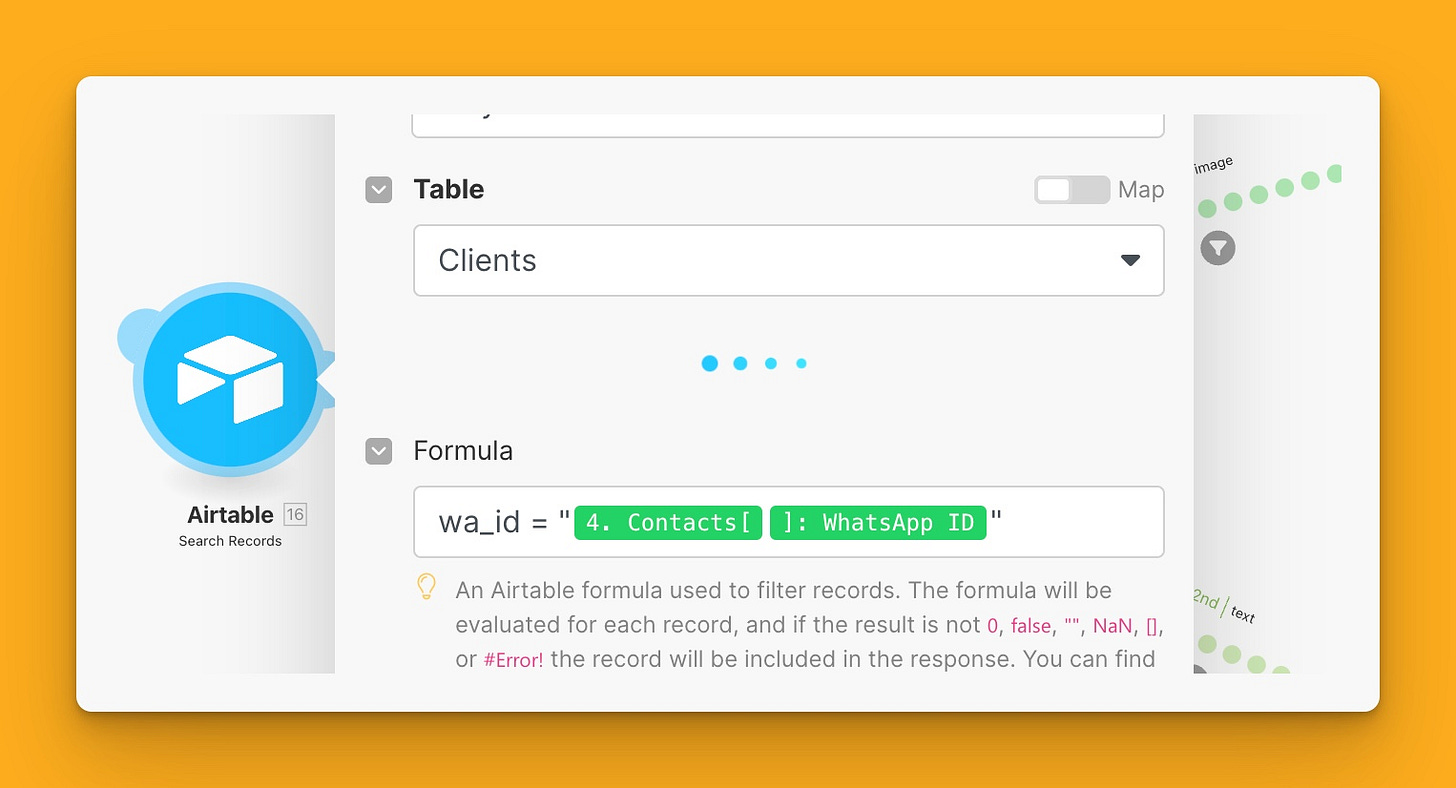
However, before this Router module, we'll insert one more module that will check whether we're dealing with a new or existing client. This will come in handy later when we need to assign this conversation to a client in Airtable. So we put a Search records module within Airtable earlier and search by the appropriate WhatsApp identifier (in subsequent steps for new clients, of course, we'll be filling it in for the first time):
Now, depending on the received message, we'll prepare and send a response and also save it to our database.
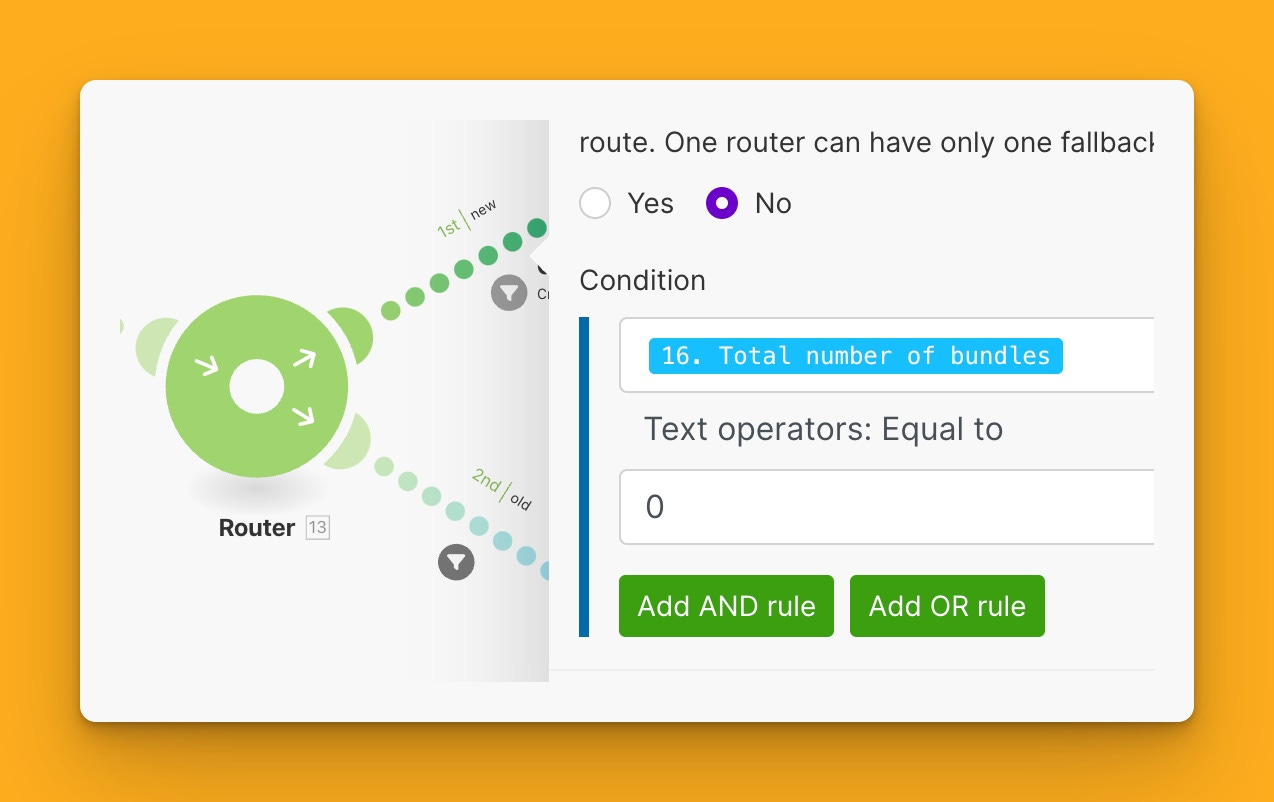
Let's first deal with the path for text messages. Depending on whether it's a new or existing client, we'll go different routes, so we add another router when we already know that the message is text, handling a new client in this way:
And similarly, in the second path, for an existing client, the value will be equal to 1 instead of 0. This indicates that the module, marked as 16 (Airtable Search) in the previous screen, found or did not find the client in the database.
The paths for new and existing clients will be logically very similar, as you might guess, they will differ in that for a new one, we'll create an "account" for them, and for an existing one, we'll simply add the conversation to that "account". But that's not all! We'll also create something like onboarding for new users. Therefore, let's start with the simpler branch of the scenario, which is for a user we already have in the database:
The scenario we're implementing looks like this:
Create a record in the Entries table that contains the details of this conversation
Create a response to the user's question using the OpenAI module
Send a message to the user
Update the recently created record with the response
The prompt in this case might look like this:
Act as a professional, kind and caring health coach, and answer user question so that he's motivated to make better food choices and health decisions. Be casual and friendly, using simple language and explain some interesting facts like Andrew Huberman. Add that you're waiting for more photos. In this case don't use more than 1000 signs.Of course, you can expand and change it depending on your needs, this one is very basic to illustrate what we want to achieve.
So we encourage the user to send a photo. Before we discuss the part of the scenario for new users, let's trace what happens when we actually receive a photo, not text. This requires going back a bit in our steps. We'll finish the scenario for new users in a moment - now see how you can handle photo uploads.
Step 4: Handling photo uploads
This part of the scenario looks like this:
In practice, it's not very complicated and works very similarly to what we did in Step 1.5, if you did it. So you can use the same modules now, but we'll expand them a bit:
I make sure I'm dealing with an existing client (first filter)
I save the photo to my Dropbox using the Dropbox → Upload a file module
I create a link to this photo (Dropbox → Create a share link)
I save this photo to Airtable and create a new record for this conversation
Then, I create a response using OpenAI and send messages
Next, I update the recently created record with the sent response
Why do I use two OpenAI and WhatsApp modules? I simply send two messages in a row to make the conversation more fluid. The first message simply informs that I've accepted the photo for analysis and the prompt looks something like this:
create a short message thanking user for sending a photo and inform, that you'll analyse it and send feedback shortly. If user_message contains data, also include something that confirms you understood it!Make it less than 200 characters.And the next contains the actual analysis using the Vision model, which takes longer, a simple prompt looks like this:
Analyze the photo carefully, take into consideration in reply user_message if exists. If it contains health related data: Try to analyse the data and give your best health advice on this data. If it contains restaurant menu: Try to advice the best possible healthy choice and give reasoning why recommended food is nutrically best. If it contains food: Make your best guess about the quantities of food and their ingredients. List the ingredients, calories, total calories and important nutrition data including: proteins, fat, carbohydrates, iron, B12. If you can give any advice how this meal could be improved or complemented during the day for better health benefits, do. Encourage user to keep going if the meal is healthy and explain what could be improved if not so much. If it contains something else: Inform user, that you expect photos of food, health data or restaurant menu. The tone should be friendly, casual, Andrew Huberman style. Use no more than 1500 signsThis is the most important part that analyzes and responds to messages. The principle of operation is very similar to the very beginning in step 1.5, but we simply add more elements here that improve the operation of our application.
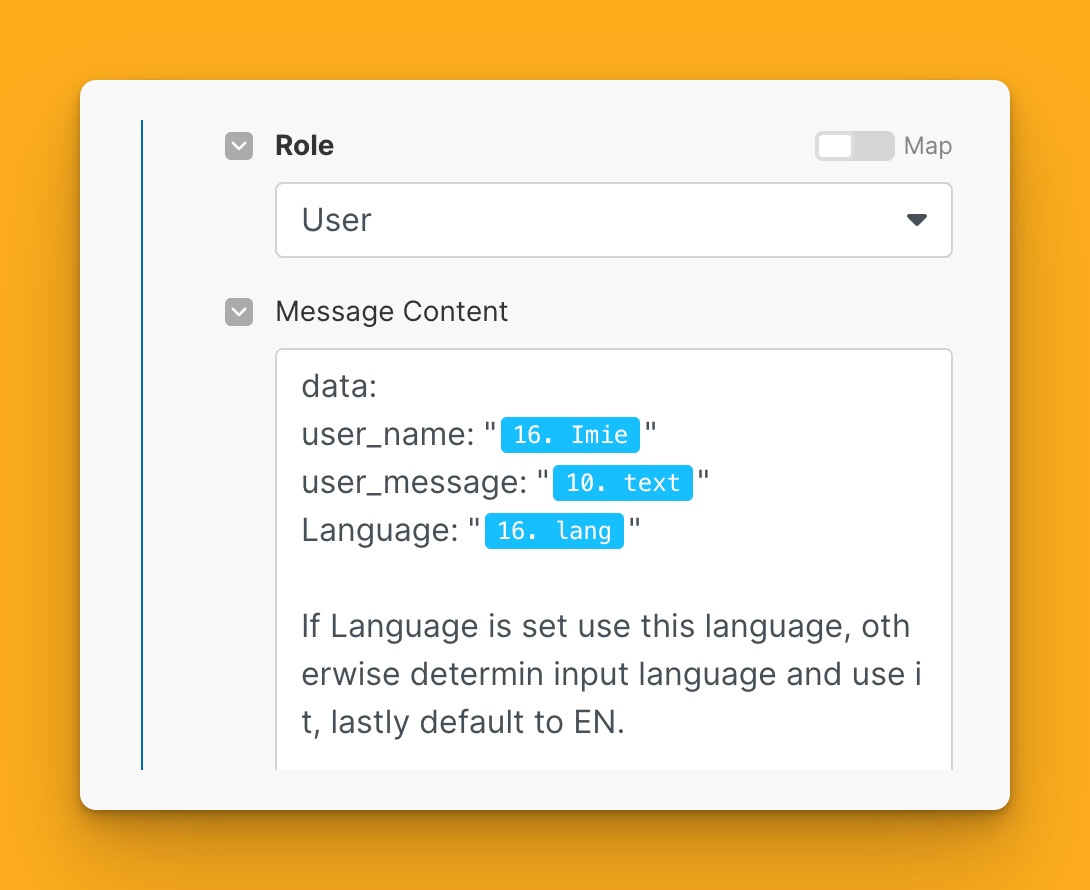
Additionally, we'll also add handling of the appropriate language to our prompts. In a moment we'll deal with onboarding and set the language of communication there, which we'll consider in each subsequent conversation. Besides language, we'll pass some user data to the prompt, so that, for example, it would be possible to address them by name. In short, here's the first part of each of our prompts:
Step 5: Handling a new user
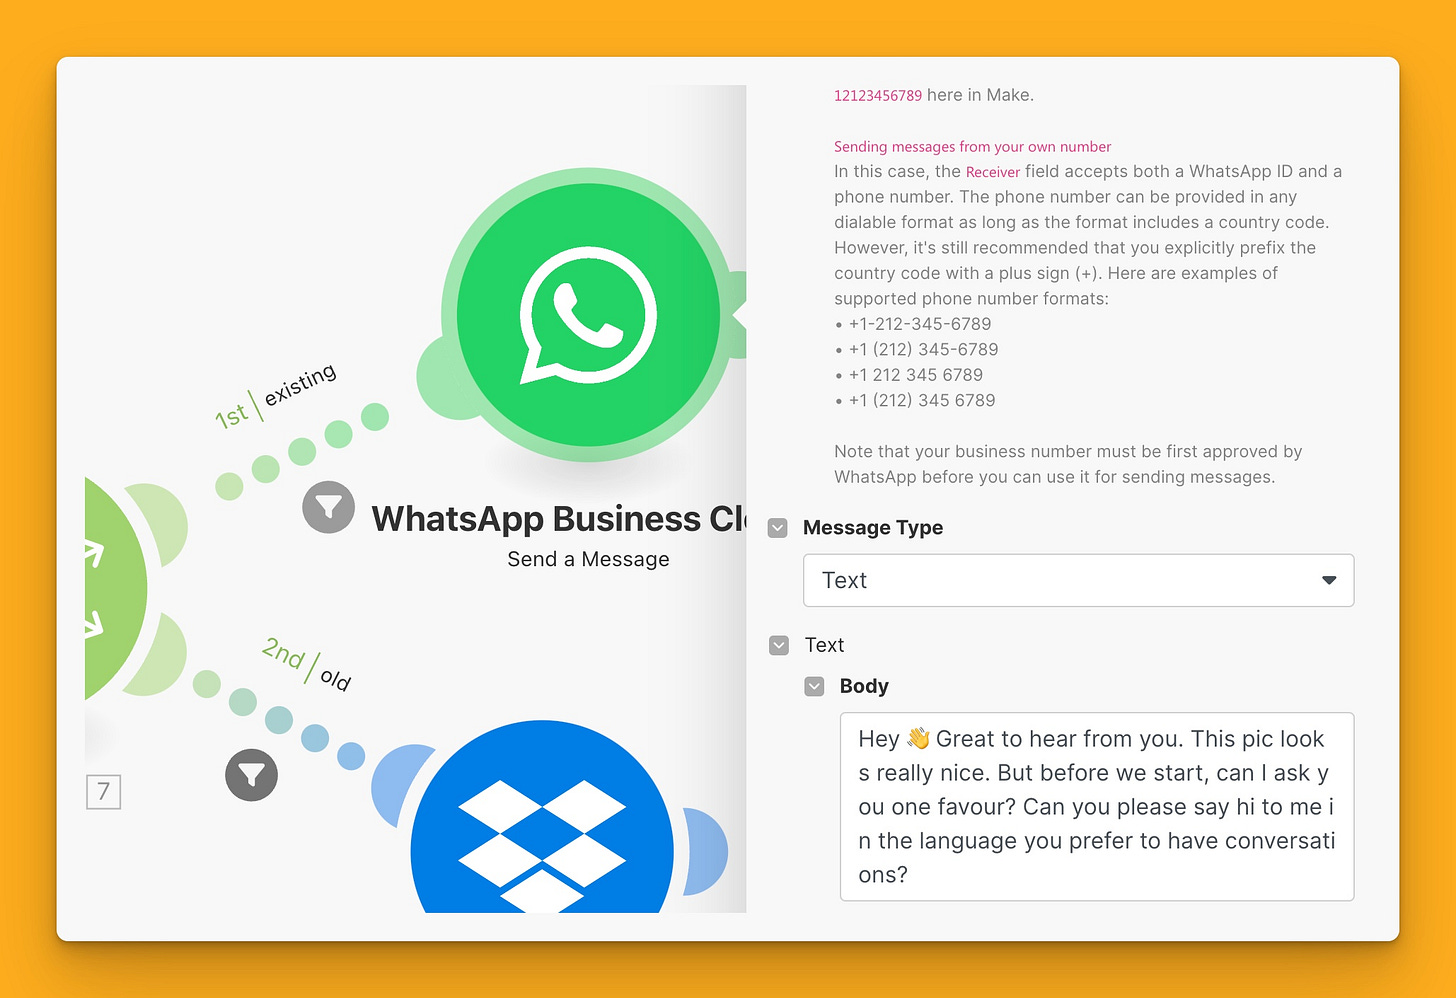
The previous path handled a conversation initiated by an existing user. In the case of a new user, we'll handle the scenario path that deals with images in a simple way - we'll simply return a message that will trigger onboarding in the next message. It will be initialized with a greeting in any user language, so if a new user sends an image, we'll simply send this type of message:
This means that onboarding will be triggered when the user sends us a greeting in their language. It's also a way for the user to initiate the conversation. This is the preferred method for WhatsApp, so the CTA on our page could look like this: "Send a greeting in your language to our number to start".
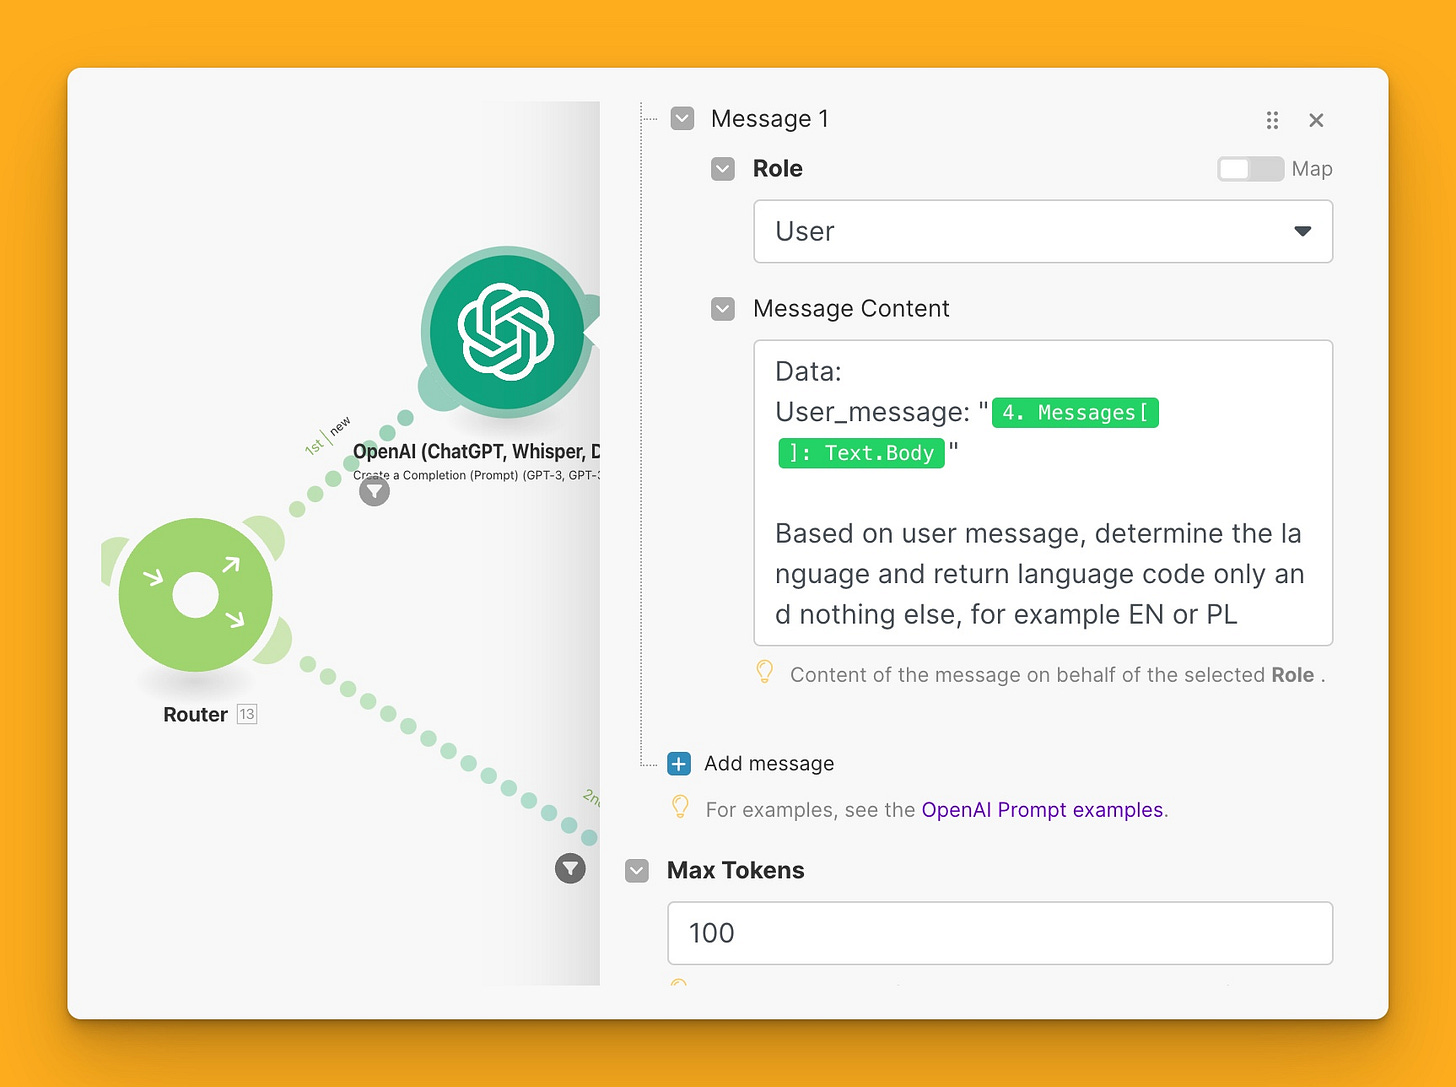
Let's go through the path for a new user. To begin with, we want to establish one important thing: language. We'll save to the database what language the user communicates in, and we'll always prepare responses for them in that language.
For this purpose, I use the OpenAI module and create a simple prompt to figure out what language we're dealing with:
Next, I can already create in our database:
The user themselves with their properties
An entry representing the message and the response to it
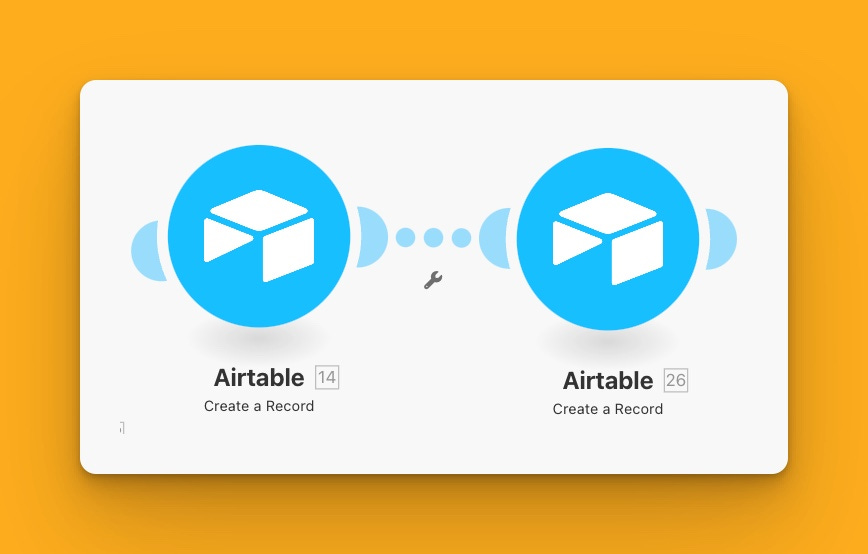
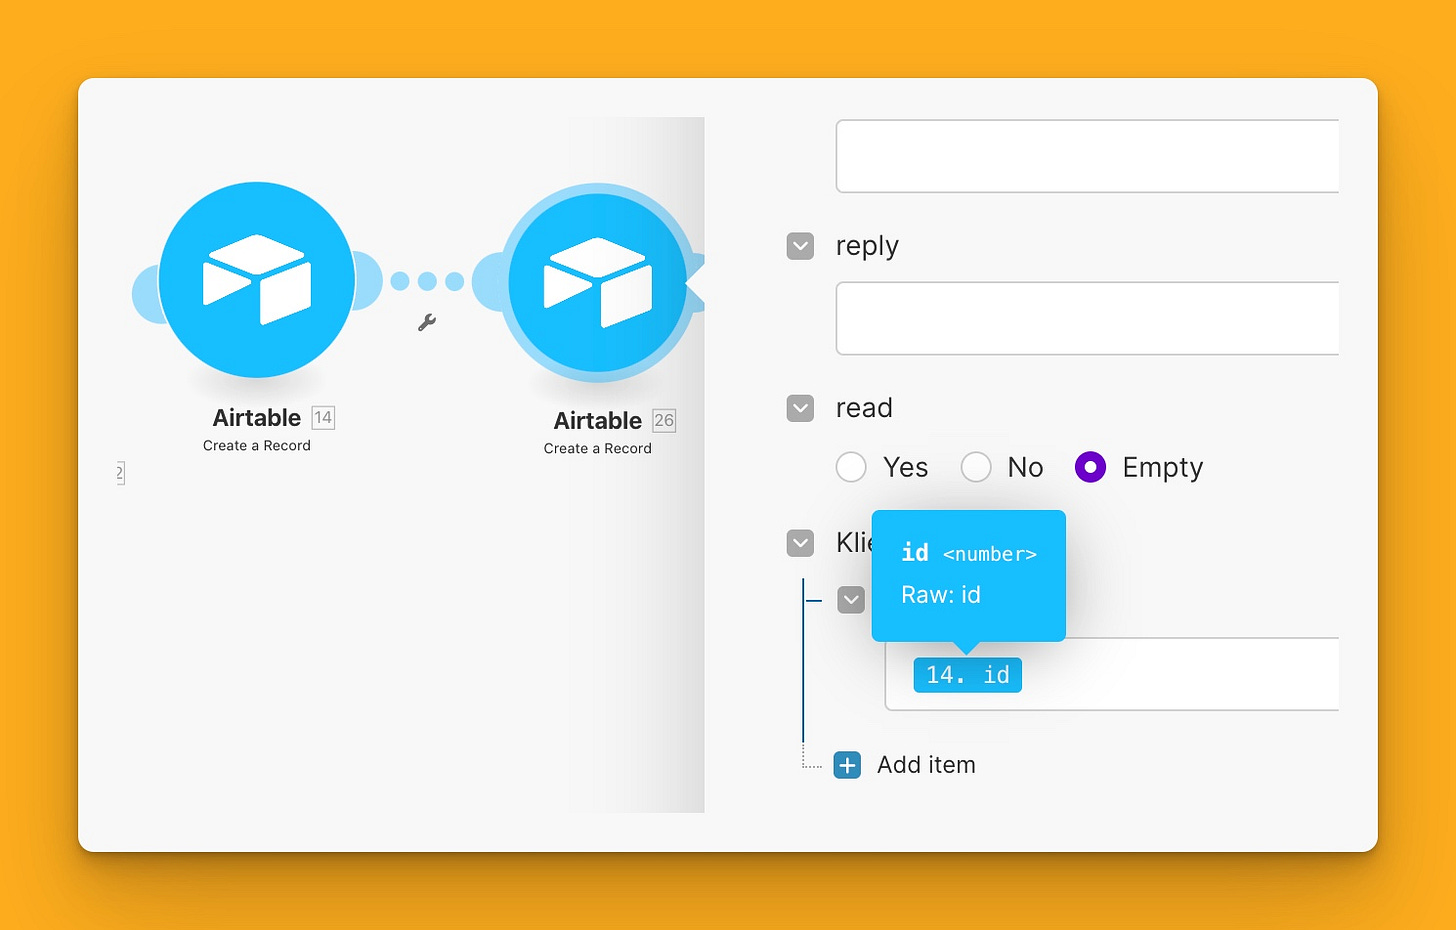
So I use two Airtable modules that separately add the user and fill in all the necessary fields, using the data we received from the WhatsApp module as well as language data, and I also create a new conversation that I add to the Entries table in Airtable.
How do I link the user and the entry from the automation level? It's very simple - I just pass the identifier of the client field that was created in the previous module (14) in the appropriate field:
In the next step, we'll guide the user through a simple onboarding, collecting some data from them. We'll ask the user a few questions in subsequent messages, and we'll interpret the answers they provide with the help of the OpenAI module and artificial intelligence. The sequence might look something like this:
The subsequent prompts contain the following sequence:
A greeting, and introduction as Klara, a personal diet coach
Explanation of how the application works
Information that Klara doesn't remember the entire conversation history (this will be done later in a simplified form)
Finally, a request to send basic data that will be used to calculate BMI, i.e., height, weight, gender, and age.
This concludes the new user path, as we are currently waiting for their response. If such a message is sent, it will already be an existing user, so such a message will go through the existing user path for text messages - this is the last element of our puzzle. It looks something like this:
And this part of the scenario in order:
Creates a new message entry in the Entries table
The next OpenAI module checks if the message actually contains the information we asked for in the onboarding - if so, it creates a JSON object appropriately formatting this data.
Next, we check if this JSON was actually prepared, if so, it means we're finishing the onboarding.
Finishing the onboarding involves a Parse JSON module, which changes JSON into data that we can then place in the appropriate cells of the Airtable table, as well as formatting a response in which we thank for sending the data and encourage sending photos of their meals.
The second path concerns the situation when the user doesn't finish the onboarding, but simply sends some question in text form. Then the second part of the prompt I showed earlier comes into play, that is, a specific answer, advice for the user is created. We simply send such advice in the form of a message and save this answer to Airtable.
The complete, finished scenario looks as follows:
And here I've recorded a video for you that presents the entire new user path:
Whoa! That’s it (for now). I hope you enjoyed the process. This essentially shows how easy it is, using this blueprint, create coaching apps for any given topic, that really drive value! There’s still some things that could be done, such as:
Ability to remember conversations
Reminders
Weekly reports
And more! Luckily, this all can be done using no-code and automations, which is simply amazing. This puts the power of creating solutions as such to literally anyone, who wants to learn and experiment.
If this article get a lot of comments and you’ll further explore our new 💎 Gems section for paid subscribers, I can create part 2 with all those missing features, and also part 3, with monetization strategy and go-to-market tools and my proven techniques. What do you say?
Keep building!
Greg











Comments are open! If you want more content like this, let us know!
Interesting take. Can be very useful for customers that have already some knowledge about healthy eating department and will be able to judge if advice offered is not harmful (due to sporadic hallucinations). I would love to know more! So hopefully there will be part 2 and 3 ;)